Painting a room in two different colors can be an exciting way to bring character and depth to a space. Whether you’re looking to create a bold contrast or a subtle transition between shades, this technique can transform the look and feel of any room. It’s a perfect way to define areas within a space, highlight architectural features, or simply add a creative touch to your home. However, achieving a clean, professional finish when dividing a wall with two colors requires careful planning, the right tools, and attention to detail. This detailed guide will walk you through the process step-by-step, from choosing the right colors to the final touches, ensuring that your room ends up looking polished and well-balanced. By the end, you’ll have all the knowledge needed to confidently tackle this project and give your room a stylish, two-tone makeover.
1. Choosing Your Colors
The first step in painting a room with two different colors is selecting the colors themselves. This decision will set the tone for the entire room, so it’s essential to choose wisely. Here are some tips to help you make the right choice:
- Consider the Room’s Purpose: The function of the room should guide your color choices. For example, calming blues and greens might be ideal for a bedroom, while more vibrant colors like yellow or orange could be great for a kitchen or playroom.
- Complementary vs. Contrasting Colors: Decide whether you want a complementary look, where the two colors are similar in tone but different enough to notice, or a contrasting look, where the colors are distinct and create a bold visual impact.
- Lighting Considerations: Remember that natural and artificial lighting can significantly affect how colors appear on your walls. Test your chosen colors by painting small swatches on the wall and observing them at different times of the day.
- Use of Accent Colors: If you’re using a neutral color for one part of the room, consider a bold accent color for the other to create a focal point or highlight a specific area.
2. Planning the Division
Once you’ve selected your colors, the next step is to decide how you want to divide the room. There are several ways to approach this, depending on the effect you want to achieve:
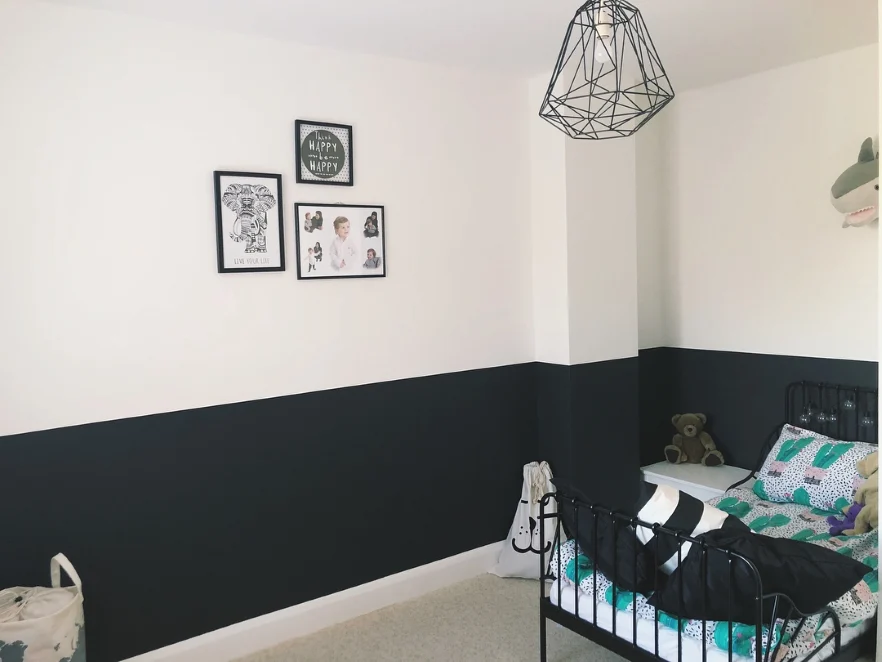
- Horizontal Division: A common approach is to paint the lower half of the wall one color and the upper half another. This can make a room feel cozier or add visual interest without overwhelming the space.
- Vertical Division: Painting two adjacent walls different colors can create a dynamic look, especially in open-plan spaces where you might want to define different areas visually.
- Feature Wall: Sometimes, the two colors are used to create a feature wall, where one wall is painted a bold color, and the rest of the room is done in a more subdued shade.
- Using Architectural Features: If your room has chair rails, wainscoting, or other architectural details, use them as natural dividing lines for your colors.
3. Preparing the Room
Preparation is key to achieving a professional finish. Here’s what you need to do before you start painting:
- Clear the Space: Remove all furniture, decorations, and anything else that might get in the way. Cover any items that can’t be moved with drop cloths or plastic sheets.
- Clean the Walls: Dirt, dust, and grease can prevent paint from adhering properly. Clean the walls thoroughly with a mild detergent solution and allow them to dry completely.
- Repair Any Damage: Fill in any holes or cracks with spackling compound, sand them smooth once dry, and wipe away any dust.
- Protect Surfaces: Use painter’s tape to cover baseboards, trim, windows, and any other areas you don’t want to be painted. Lay down drop cloths to protect the floor.
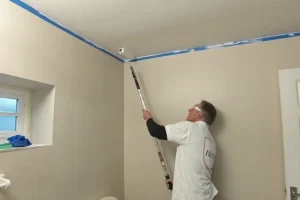
4. Marking the Division Line
Creating a clean, straight line between two colors is essential for a polished look. Here’s how to do it:
- Measure and Mark: Decide where you want the division to occur and use a measuring tape to mark that spot on the wall. For horizontal divisions, use a level to ensure the line is perfectly straight.
- Apply Painter’s Tape: Once you’ve marked the division line, apply painter’s tape along the line. Press the tape down firmly to prevent paint from seeping underneath.
- Double-Check Your Line: Before you start painting, step back and double-check that your tape line is straight and in the correct position.
5. Priming the Walls
Priming is an important step, especially if you’re painting over a dark color or if the walls have stains. Primer helps the paint adhere better and ensures a uniform finish:
- Choose the Right Primer: Use a primer that’s appropriate for the type of paint and the surface you’re working on. If you’re painting with a very light or very dark color, consider using a tinted primer to help with coverage.
- Apply the Primer: Using a roller, apply the primer in even strokes, covering the entire wall. Use a brush for corners and edges. Allow the primer to dry completely before moving on to painting.
6. Painting the First Color
With the primer dry and your room prepared, you can start applying the first color:
- Start with the Lighter Color: If one of your colors is lighter, start with that one. It’s easier to cover a light color with a darker one if any touch-ups are needed later.
- Cut In the Edges: Begin by cutting in the edges with a brush, carefully painting along the tape line and around trim, corners, and edges. Take your time to ensure clean lines.
- Roll the Paint: Use a roller to apply the paint to the rest of the wall, working in sections and overlapping slightly to avoid streaks. Apply at least two coats, allowing each coat to dry before applying the next.
- Remove the Tape: Once the final coat is dry but not fully cured, carefully remove the painter’s tape. Pull it off at a 45-degree angle to avoid pulling up any paint.
7. Painting the Second Color
Now it’s time to apply the second color. This process is similar to the first but with a few added considerations:
- Reapply Tape if Needed: If you’re painting adjacent sections of the wall, reapply tape along the division line, ensuring it’s firmly pressed down.
- Cut In and Roll: Repeat the process of cutting in and rolling the paint. Be extra careful when painting near the division line to avoid overlapping the colors.
- Check for Bleeding: After removing the tape, check if any paint has bled under the tape. If it has, touch up the area with a small brush to create a crisp line.
8. Finishing Touches
Once both colors are applied, there are a few final steps to ensure your room looks polished and professional:
- Inspect the Walls: Look for any spots where the paint coverage isn’t even or where touch-ups might be needed. Use a small brush to correct any imperfections.
- Clean Up: Remove any remaining painter’s tape, gather drop cloths, and clean your brushes and rollers. Ensure all surfaces are dry before moving furniture and decorations back into place.
- Decorate Thoughtfully: When decorating, consider how your chosen colors interact with the room’s furnishings and accents. Use complementary or contrasting decor to enhance the two-tone effect.
9. Common Mistakes to Avoid
Even with careful planning, mistakes can happen. Here are some common pitfalls and how to avoid them:
- Skipping the Primer: Not using primer can result in uneven coverage and colors that don’t appear as intended. Always prime your walls first, especially if you’re covering a dark color.
- Rushing the Process: Painting a room in two colors takes time. Rushing through steps like taping or drying can lead to sloppy results. Be patient and allow each coat to dry fully before moving on.
- Using Cheap Tools: High-quality brushes, rollers, and painter’s tape can make a significant difference in the final outcome. Invest in good tools for a professional finish.
10. Maintaining Your Two-Tone Room
Once your room is painted, it’s important to keep it looking fresh. Here’s how to maintain your newly painted walls:
- Clean Regularly: Dust and clean your walls regularly with a soft cloth to keep them looking vibrant. For more stubborn stains, use a mild soap and water solution.
- Touch Up When Needed: Keep a small amount of leftover paint for touch-ups. If you notice any chips or scuffs, address them promptly to maintain the integrity of your two-tone design.
- Repaint Over Time: While a good paint job can last several years, you may eventually need to repaint. When that time comes, follow the same careful process to ensure a flawless finish.
Conclusion
Painting a room in two different colors is a fantastic way to add personality and style to your home. With careful planning, the right tools, and attention to detail, you can achieve a professional-looking result that will transform your space.
Whether you’re going for a bold contrast or a subtle blend, this guide has provided you with everything you need to know to tackle the project with confidence. By following these steps, you’ll create a beautifully painted room that reflects your unique taste and enhances your home’s overall aesthetic.