Painting a ceiling may seem like a daunting task for beginners, but with the right approach, it’s entirely manageable. Whether you’re updating a room’s look or simply refreshing the paint, the process requires some basic tools, a bit of patience, and a solid understanding of the steps involved. For those new to painting, it’s important to approach the task systematically, paying attention to preparation and technique to achieve a smooth, professional-looking finish. This guide breaks down everything you need to know, from gathering the proper supplies to applying the final coat of paint. By following this step-by-step process, even a beginner can confidently tackle a ceiling-painting project with ease and efficiency. Along the way, tips and suggestions will be provided to avoid common mistakes and ensure a job well done.
Preparation is Key
Before starting any paint job, preparation is essential. This is especially true when painting ceilings, as there is more potential for mess and accidents. Proper preparation will make the entire project smoother and ensure better results.
1.1 Gather Supplies
First, make sure you have all the necessary supplies on hand. Here’s what you’ll need:
- Paint roller with an extension pole
- Ceiling paint (flat or matte finish works best)
- Drop cloths or plastic sheets to protect furniture and floors
- Painter’s tape
- Ladder
- Roller tray
- Angled brush for cutting in (for corners and edges)
- Spackle and putty knife (for filling in holes)
- Sanding block
- Dust mask or respirator
- Safety goggles
1.2 Clear the Space
Remove as much furniture and fixtures from the room as possible. Anything that can’t be moved, such as larger furniture pieces, should be covered with plastic sheets or drop cloths. Make sure the floor is well protected to prevent any paint splatters.
1.3 Clean the Ceiling
A clean surface is vital for paint to adhere properly. Dust and debris can interfere with the final result. Using a damp cloth or sponge, wipe down the ceiling to remove any dust, cobwebs, or dirt. For kitchens or bathrooms, where grease or residue might be present, use a mild detergent to clean the surface.
1.4 Patch and Sand
Inspect the ceiling for any cracks, holes, or imperfections. Use spackle and a putty knife to fill in these spots. Allow the spackle to dry, then lightly sand the patched areas with a sanding block to ensure they are smooth and flush with the ceiling surface. Wipe the ceiling again to remove any dust from sanding.
1.5 Apply Painter’s Tape
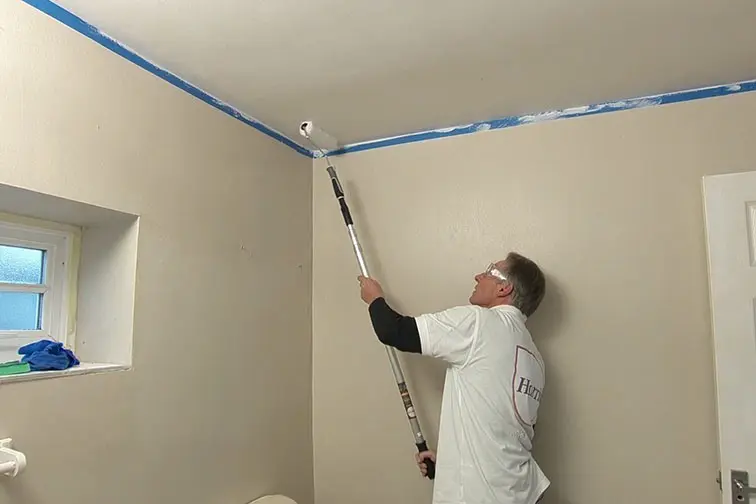
If you’re painting a ceiling with adjacent walls or molding that you don’t want to get paint on, use painter’s tape to protect these areas. Apply the tape along the edges of the ceiling where it meets the walls to ensure clean, crisp lines.
Choosing the Right Paint
Selecting the right paint is crucial to achieving a good finish. Ceiling paints differ from wall paints in their consistency and finish.
2.1 Ceiling Paint vs. Wall Paint
Ceiling paint is typically thicker than wall paint, which helps to minimize drips and provides better coverage with fewer coats. Additionally, ceiling paints often come in flat or matte finishes, which help to hide imperfections on the surface. Avoid using glossy or semi-gloss paints on ceilings, as they tend to highlight flaws.
2.2 Selecting the Color
While white is the most common choice for ceilings, don’t be afraid to experiment with soft neutrals or even a slightly lighter shade of your wall color. A pale blue or soft gray ceiling can add dimension and visual interest to a room. However, for beginners, sticking to a classic white or off-white is the easiest option.
How to Apply the Paint
Now that the preparation is complete, it’s time to start painting. Painting a ceiling requires a bit of strategy to ensure even coverage and minimize the risk of streaks or lines.
3.1 Cutting In the Edges
Before using a roller, you’ll need to “cut in” the edges of the ceiling. This involves using an angled brush to paint the perimeter of the ceiling where it meets the walls or molding. Dip the brush in the paint and carefully apply it along the edges, creating a border about 2-3 inches wide. This will allow you to use the roller without worrying about missing the corners.
3.2 Load the Roller Properly
When using the roller, avoid overloading it with paint. Dip the roller into the tray and roll it back and forth to evenly distribute the paint. Too much paint on the roller can lead to drips and uneven coverage.
3.3 Use an Extension Pole
For ceilings, it’s best to attach an extension pole to your roller. This allows you to cover more area without having to constantly climb up and down a ladder, making the process faster and less tiring. The pole should be long enough for you to comfortably reach the ceiling without straining.
3.4 Paint in Sections
Begin painting in small, manageable sections. It’s best to work in a grid-like pattern across the ceiling. For each section, start by rolling in one direction (such as from north to south), then go over the same area with the roller moving in the opposite direction (east to west). This “W” or crisscross technique ensures even coverage and helps prevent roller marks.
3.5 Maintain a Wet Edge
One of the keys to a smooth finish is maintaining a wet edge. This means that as you paint each new section, you should slightly overlap it with the previous section while the paint is still wet. This helps to blend the paint and avoid streaks or lap lines.
Dealing with Common Challenges
Even with careful preparation and technique, beginners may encounter a few challenges while painting a ceiling. Here’s how to handle them:
4.1 Drips and Splatter
Drips can happen if the roller is overloaded with paint or if the roller is applied too quickly to the ceiling. To prevent this, apply the paint in slow, even strokes, and always roll off excess paint before applying it to the ceiling.
If you notice a drip while the paint is still wet, immediately roll over it to smooth it out. If the paint has dried, use a small brush to touch up the area.
4.2 Uneven Coverage
If some areas of the ceiling look patchy or uneven, it’s often due to inconsistent pressure on the roller. Try to apply even pressure across the entire surface, and don’t be afraid to apply a second coat if necessary.
4.3 Roller Marks
Roller marks, or streaks, are common when painting large surfaces like ceilings. To avoid them, make sure the roller is evenly loaded with paint and use the “W” technique to blend each section. If roller marks appear after the paint has dried, a second coat of paint can often smooth them out.
Final Touches and Cleanup
After the ceiling is painted, the final steps are just as important to ensure a professional result.
5.1 Inspect the Ceiling
Once you’ve finished painting, step back and inspect the ceiling from different angles. Look for any areas that may need a second coat or touch-ups. If necessary, lightly apply another coat once the first coat has dried completely.
5.2 Remove Painter’s Tape
Before the paint fully dries, carefully remove the painter’s tape from the edges. Doing this while the paint is still slightly wet ensures a cleaner line and reduces the risk of peeling off any dried paint along with the tape.
5.3 Clean Up
Once the painting is done, clean your brushes, rollers, and trays with water (for water-based paints) or the appropriate cleaner for oil-based paints. Dispose of any used drop cloths or plastic coverings, and return furniture and fixtures to their original positions.
Tips for Future Projects
- Test the Paint Color: Before committing to a paint color, consider testing a small patch on the ceiling to see how it looks in the room’s lighting.
- Use a Paint Shield: A paint shield or painter’s shield can help protect walls and furniture during the cutting-in process.
- Ventilation: Ensure the room is well-ventilated while painting, especially if using oil-based paints, to avoid inhaling fumes.
- Take Breaks: Painting a ceiling can be physically demanding, so take breaks to rest your arms and neck.
Conclusion
Painting a ceiling for the first time might seem intimidating, but by following these steps and maintaining a steady pace, you can achieve a professional-looking finish. With proper preparation, the right tools, and careful attention to technique, even beginners can tackle this project with confidence.
By taking the time to understand the process, you’ll not only refresh the look of your space but also gain valuable experience for future home improvement projects.


