Building a shed floor on skids is a practical and efficient way to create a sturdy foundation for your shed. Skids, which are long wooden beams, provide a strong and durable base, making the structure movable and offering protection against ground moisture.
Whether you’re an experienced DIY enthusiast or a beginner, constructing a shed floor on skids can be a rewarding project. This guide will walk you through the process step-by-step, from gathering materials and preparing the site to assembling the floor frame and attaching it to the skids.
By the end of this guide, you will have the knowledge and confidence to build a solid shed floor that will last for years. Let’s get started with the basics of building a shed floor on skids!
Step 1: Gather Your Materials and Tools
Before you begin, it’s essential to have all the necessary materials and tools. Here’s what you’ll need:
- Materials:
- Pressure-treated lumber (4×4 or 6×6 for skids)
- Pressure-treated lumber (2×6 or 2×8 for floor joists)
- Plywood or OSB (Oriented Strand Board) for the flooring
- Galvanized nails or screws
- Metal joist hangers
- Gravel or pavers for the skid foundation (optional)
- Tools:
- Circular saw
- Hammer or nail gun
- Measuring tape
- Carpenter’s square
- Level
- Drill
- Shovel
- Safety glasses and gloves
Step 2: Choose the Location and Prepare the Ground
- Select the Location:
Choose a flat, level area where you want to place your shed. Ensure there is adequate drainage and that the area is free of large rocks, roots, or other obstacles. - Mark the Shed Area:
Measure and mark the dimensions of your shed floor using stakes and string. Make sure the lines are square by measuring diagonally from corner to corner; both measurements should be equal. - Prepare the Ground:
Clear any vegetation or debris from the area. If needed, dig out any high spots and fill in low spots to create a flat and level surface. To prevent moisture and weed growth, consider adding a layer of gravel or pavers under where the skids will rest.
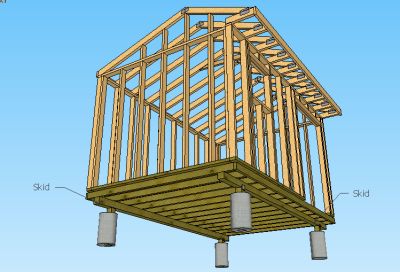
Step 3: Position the Skids
- Determine the Number of Skids:
Depending on the size of your shed, you will need a different number of skids. Typically, three skids are sufficient for a small to medium-sized shed. Larger sheds may require four or more skids. - Cut the Skids to Length:
Cut the 4×4 or 6×6 pressure-treated lumber to the desired length of your shed. Make sure all skids are of equal length. - Place the Skids:
Lay the skids on the ground, parallel to each other. Ensure they are evenly spaced and aligned with the edges of the marked area. The skids should be placed perpendicular to the floor joists to provide maximum support. - Level the Skids:
Use a level to check that all the skids are level and sitting flat. You may need to adjust the ground beneath the skids by adding or removing gravel or soil until they are perfectly level.
Step 4: Build the Floor Frame
- Cut the Floor Joists:
Cut the 2×6 or 2×8 lumber to the length of your shed floor. These will serve as the floor joists. - Assemble the Frame:
Lay the two outer floor joists along the edge of the skids. Place additional joists between them, spaced 16 inches apart, and attach them to the outer joists using galvanized nails or screws. Ensure all joists are square and aligned. - Install Joist Hangers:
Attach metal joist hangers to each end of the interior joists for added strength and stability. Ensure that the hangers are securely fastened to both the joists and the outer frame. - Secure the Floor Frame to the Skids:
Position the floor frame on top of the skids, making sure it is centered and aligned. Attach the frame to the skids using long galvanized screws or bolts. This will help prevent any movement between the frame and the skids.
Step 5: Install the Flooring
- Cut the Plywood or OSB Sheets:
Measure and cut the plywood or OSB sheets to fit the dimensions of the floor frame. You may need to trim the edges to ensure a perfect fit. - Lay the Flooring:
Start by placing the first sheet of plywood or OSB at one corner of the frame. Align the edges with the frame and secure it using galvanized screws or nails. Repeat this process for the remaining sheets, ensuring each sheet is tightly butted against the next. - Stagger the Joints:
When laying multiple sheets of plywood or OSB, stagger the joints so they do not align with each other. This provides additional strength and prevents weak spots in the floor. - Secure the Flooring:
Use a drill or hammer to fasten the sheets to the floor joists with screws or nails, placing fasteners every 8-12 inches along each joist.
Step 6: Finishing Touches
- Check for Level:
Use a level to check the floor for any uneven areas. Make any necessary adjustments to ensure the floor is completely level. - Seal the Edges (Optional):
For added protection against moisture, consider sealing the edges of the plywood or OSB with a wood sealant or paint. - Install Additional Supports (Optional):
For larger sheds or those intended to hold heavy equipment, consider adding extra supports such as cross-bracing between the joists or additional skids.
Tips and Best Practices
- Use Pressure-Treated Lumber:
Always use pressure-treated lumber for outdoor projects to protect against moisture, rot, and insects. - Check Local Building Codes:
Make sure your shed complies with local building codes, which may require permits or specific construction methods. - Take Safety Precautions:
Wear safety glasses and gloves while cutting lumber and handling tools. Ensure all tools are in good working condition. - Plan for Ventilation:
To prevent moisture buildup, consider adding ventilation to the shed or using a breathable ground cover under the skids.
Conclusion
Building a shed floor on skids is a practical, cost-effective way to create a solid foundation for your shed. By following these steps and taking the time to prepare properly, you can build a durable floor that will support your shed for years to come.
Whether you are looking to create extra storage, a workshop, or a garden shed, this guide provides all the information you need to get started with confidence.
Remember, the key to a successful project is careful planning, quality materials, and attention to detail. Enjoy your DIY journey and the satisfaction of building something with your own hands!